

A CO2 laser power supply provides the high voltage required to operate a glass CO2 laser tube. Correct model selection, wiring, grounding and cooling protection are essential for safe and stable operation.
Terminal definitions and control methods may vary between models. Before installation, always check the product label and the wiring diagram supplied with the specific power supply.
Checks Before Installation
Before connecting the power supply, confirm:
- Power supply model
- Rated power of the CO2 laser tube
- Required AC input voltage
- Controller output and trigger logic
- Power-control signal type
- Water-protection and safety-interlock requirements
- Installation space and ventilation conditions
Do not select a replacement power supply only by its appearance or enclosure size. Similar-looking models may have different output ratings, terminal layouts or control methods.
When replacing an existing unit, take clear photos of the original label, wiring and terminals before disconnecting any cables.
Match the Power Supply to the Laser Tube
The power supply must be suitable for the rated power and electrical requirements of the CO2 laser tube.
Incorrect matching may cause:
- Failure to start the tube
- Weak or unstable laser output
- Excessive operating current
- Abnormal electrical discharge
- Damage to the laser tube or power supply
A higher-power supply is not automatically suitable for a lower-power tube. Confirm compatibility before installation.
For model-selection support, provide the tube power, existing power supply model and clear label photos.
Verify the AC Input Voltage
Before applying power, check whether the unit requires AC110V or AC220V. The input voltage must match the local mains supply and the information shown on the product label.
Also confirm that:
- AC input terminals are correctly identified.
- The protective earth conductor is securely connected.
- Input cables and protective devices are suitable.
- No conductors are loose or damaged.
Applying the wrong input voltage may damage the power supply and create an electrical hazard.
Do not rely only on the plug type or previous machine wiring. Verify the voltage requirement from the label or technical documentation.
Identify All Terminals Before Wiring
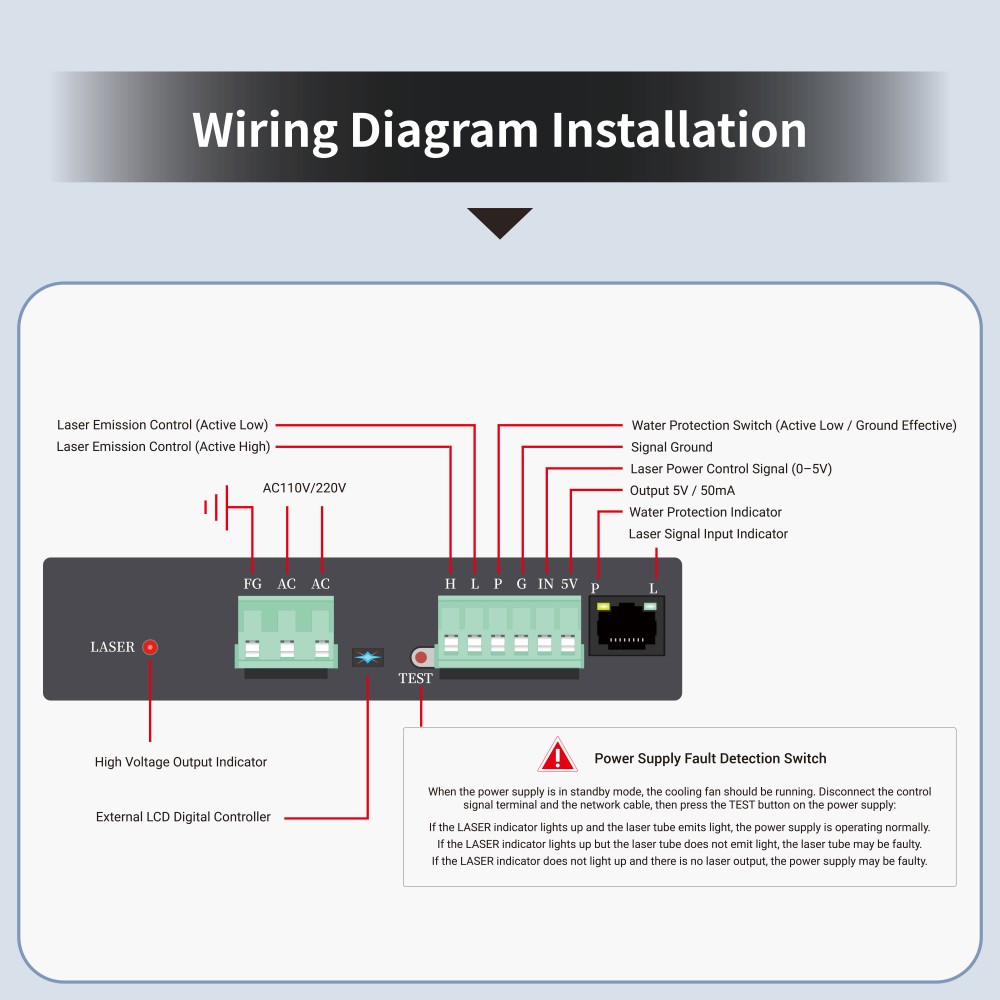
A CO2 laser power supply may include terminals for AC input, protective earth, laser triggering, power control, signal ground and water protection.
Common terminal markings include:
- FG or PE: protective grounding
- L or H: laser-trigger control
- IN: power-control input
- 5V: low-voltage reference output
- G: signal ground
- P or WP: protection or interlock input
The exact definitions are not necessarily the same on every model.
Do not connect wires according to terminal letters, wire colors or another model’s diagram without checking the documentation for the actual power supply.
Protective earth and signal ground have different functions and should not be treated as interchangeable connections.
Connect the Laser Tube Safely
The high-voltage output and return connection must follow the documentation for the power supply and laser tube.
Before working on the connections:
- Switch off the machine.
- Disconnect it from the AC mains supply.
- Follow the required waiting and discharge procedure.
- Inspect the high-voltage cable and insulation.
- Keep high-voltage wiring away from the metal frame.
- Confirm that the laser tube is securely installed.
- Keep the wiring area clean and dry.
Loose connections, exposed conductors or unsuitable insulation can cause electrical arcing and serious injury.
Never touch the high-voltage cable, laser tube anode or related connections while the system is energized. Do not open the power supply enclosure.
Connect the Controller Signals
The machine controller provides the laser-trigger and power-control signals. Depending on the model, the power supply may use active-high triggering, active-low triggering, analog voltage or PWM control.
Before connecting the controller:
- Confirm the controller output type.
- Check the required trigger logic.
- Identify the correct signal-ground terminal.
- Confirm the power-control input requirement.
- Check the water-protection and interlock circuit.
- Compare every connection with the applicable wiring diagram.
Incorrect control wiring may prevent laser output or cause unexpected firing.
Do not short control terminals as a general test method. Test connections should only be made when specified for the exact model and handled by a qualified technician.
Check Protective Grounding
The power supply enclosure and accessible metal machine frame should be connected to the protective grounding system in accordance with the equipment documentation and applicable local electrical requirements.
Check that:
- The protective earth conductor is connected to the correct terminal.
- The grounding connection is secure and free from corrosion.
- Paint or contamination is not blocking metal contact.
- Protective earth is not connected to a signal terminal.
- The ground pin has not been removed from the AC plug.
Grounding measurements should be performed by a qualified electrician using suitable test equipment.
For more details, read our guide to proper CO2 laser power supply grounding.
Check Cooling and Safety Protection
The cooling system must be operating correctly before the laser is enabled.
Confirm that:
- Cooling water is circulating properly.
- The laser tube is adequately filled.
- No significant air bubbles remain in the tube.
- The chiller or circulation system shows no alarm.
- The water-flow protection device is operating.
- The protection signal follows the correct wiring diagram.
Do not bypass the water-protection circuit. Inadequate cooling can seriously damage a glass CO2 laser tube.
Water temperature, flow rate and water-quality requirements vary between systems. Follow the instructions for the installed laser tube and chiller.
Choose a Suitable Installation Location
Install the power supply in a clean, dry and ventilated area.
The location should:
- Allow adequate airflow
- Keep ventilation openings clear
- Protect the unit from water and condensation
- Reduce exposure to smoke, dust and metal particles
- Keep high-voltage wiring properly separated
- Prevent cables from being pulled or sharply bent
- Allow safe external inspection
Do not place tools, metal objects or loose wires on the enclosure.
If condensation is found, disconnect the system and do not apply power until the equipment is completely dry and has been inspected.
Pre-Startup Inspection
Before starting the machine, confirm:
- The power supply matches the laser tube.
- The AC input voltage is correct.
- Protective grounding is connected.
- High-voltage insulation is complete.
- Control terminals are correctly wired.
- Cooling water is circulating.
- Water protection and safety interlocks are active.
- No tools or loose conductors remain inside the machine.
- No person is exposed to the laser beam path.
Perform the first startup at a low power setting according to the machine and laser tube instructions.
Keep the emergency-stop control accessible. Stop the system immediately if you notice smoke, a burning smell, electrical arcing, abnormal noise or unexpected laser firing.
Safety Rules During Operation
During normal use:
- Do not open the power supply enclosure.
- Do not touch high-voltage connections.
- Do not change wiring while the machine is energized.
- Do not operate without protective grounding.
- Do not bypass water protection or safety interlocks.
- Do not use damaged cables or insulation.
- Keep cooling and ventilation systems operating.
- Stop the machine if laser output becomes abnormal.
A CO2 laser system involves both high voltage and laser radiation. Installation and electrical diagnosis should be performed by personnel familiar with the equipment and relevant safety requirements.
When to Shut Down the Machine
Switch off the machine and disconnect the AC supply if you notice:
- Smoke or a burning smell
- Visible electrical arcing
- Unexpected or continuous laser firing
- Electric shock from the machine frame
- Melted or discolored terminals
- Damaged high-voltage insulation
- Water leakage near electrical parts
- Cooling-system failure
- Repeated controller resets
- Abnormal power supply noise
Do not continue testing until the cause has been identified by a qualified technician.
Information Needed for Technical Support
When requesting help with installation or replacement, provide:
- Existing power supply model
- Clear photo of the product label
- Laser tube rated power
- Required AC input voltage
- Photos of all terminal blocks
- Photos of the original wiring
- Machine or controller model
- Description of the problem
- Indicator or alarm information
Take all photos while the machine is switched off and disconnected from the AC mains supply.
Need Help Selecting a CO2 Laser Power Supply?
Jinan Zhenyu Electronics Co., Ltd. supplies CO2 laser power supplies for different glass laser tube power ratings and machine applications.
Send us the existing power supply model, laser tube power, input voltage and clear terminal photos. We can help check the basic matching and connection information before installation or replacement.